August 5th the Christian Motorcycle Association will be having a drive in a Columbus Baptist. Well, guess who is lucky enough to have to sing in front of a ton of big burly leather wearing men. lol. Me.. Pray for me. I found a song that keeps coming to my mind, so i decided to trust to God and let him pick the song. In the Light by DC Talk. I have an awesome couple at church who are going to sing and play with me, Including my hubby, if i can get him to play. I will have a hard time convincing him. He is so talented but he has a hard time being in front of people. Especially church family. Pray for him to use his God given ability. I hope that all will go well. I have a hard time getting in front of people too, surprisingly. I am going to try to just close my eyes. lol. Here is a link for you all. Enjoy DC Talk who were so ahead of their time.
http://www.youtube.com/watch?v=CWq1XYxtlRs&feature=related
Tuesday, July 31, 2012
Thursday, July 26, 2012
Loft bed for Matt!!!!!
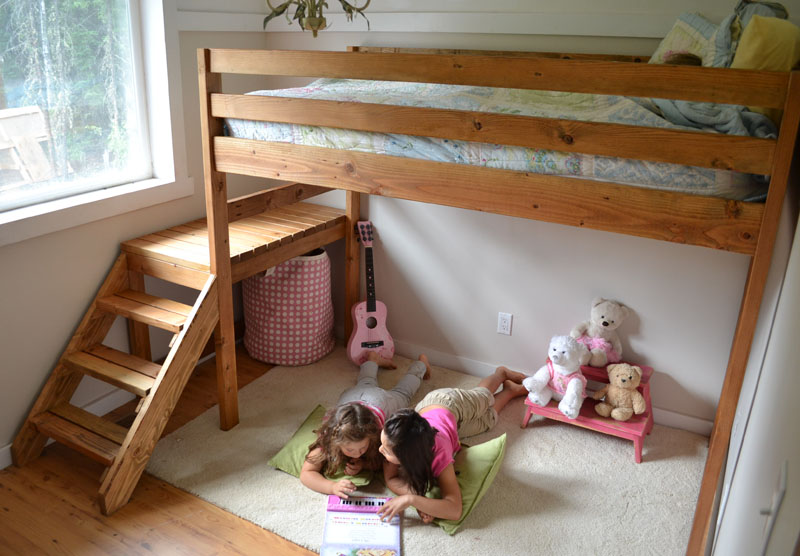
Camp Loft Bed with Stair, Junior Height
Submitted by Ana White on Wed, 2012-07-18 16:30About Project
Loft bed plans with stairs. Junior height loft bed plans free from Ana-White.com
Author Notes:
Before we get to a plan, I simply must warn you.
Do not build this bed if you want any of the following to happen:

Your kids to play independently in their room for hours and hours and hours ... if you build this bed, you will see your kids 30-40% less ...

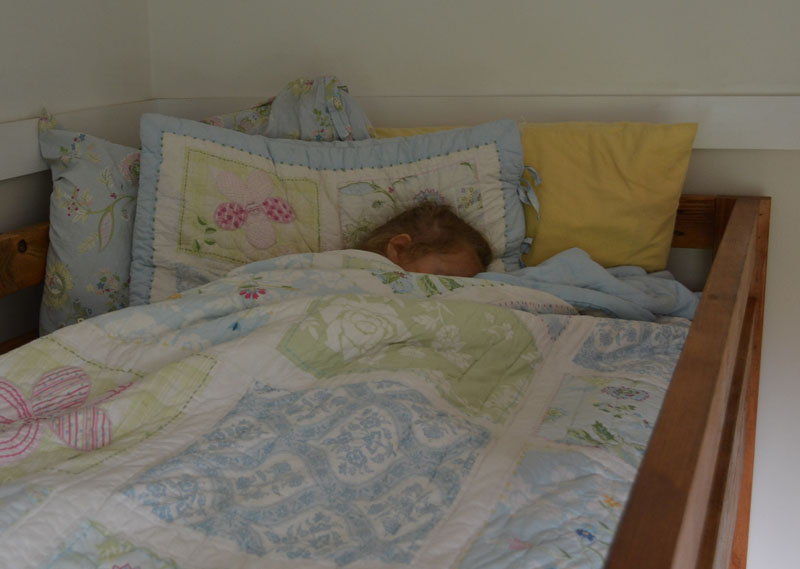
Do NOT build this bed if you want your kids to take a nap, all by themselves ... It's like a protected nest up there, with rails on all sides, and easy access with stairs. They just climb up there and go to sleep. No snuggling required.

If you build this bed, you will miss out on lots of smiles and laughter and pretend play. And when you come try to join in, they will start giggling and say, Mom! Leave us alone, we're playing horses! Or store or house or pretending the stair platform is a stage.

The only reason I built this bed was because the room is so tiny (8x8 with small closet) it was very difficult for the kids to play, and then put their things away in a space the size of a short hallway. We'd done a loft bed years ago, but the loft bed was only accessible by children, and there was no where for guests to sleep in our house.

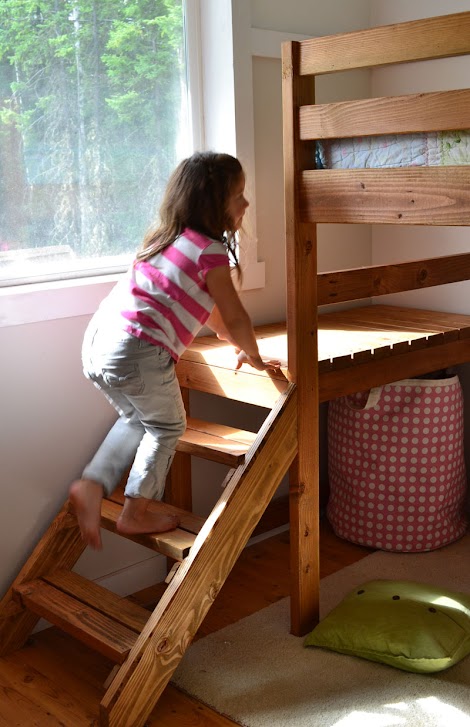
So we needed a loft bed WITH STAIRS that is sturdy and easy to access in a TINY room. With the window right there, I just didn't know how to make it work. And then one day, I realized that the stairs do NOT need to go all the way up to the bed. They only need to go up about 18" to 24" (normal height of kids mattress above floor) below the mattress.

The window was previously the obstacle in the way of building stairs. Now it's entertainment for the kids as they watch the chickens run around the back yard.

Under the bed, no storage is lost. I've been debating adding some custom sized rolling toy bins but the giant canvas bag is doing fine holding pillows, blankets and stuffed animals.

It is no exaggeration to say they play in their ALL DAY. I'm considering making a felt curtain for the front too ...

The best part about this bed is how easy and inexpensive it is to make. That's all 2x4s and 2x6s bringing the total cost of lumber up to about $50!!!
I am so excited about building this for Matt. I think i will do it this weekend so he will have a surprise when he comes back from Ohio with mamaw and papaw.

Do not build this bed if you want any of the following to happen:

Your kids to play independently in their room for hours and hours and hours ... if you build this bed, you will see your kids 30-40% less ...

Do NOT build this bed if you want your kids to take a nap, all by themselves ... It's like a protected nest up there, with rails on all sides, and easy access with stairs. They just climb up there and go to sleep. No snuggling required.

If you build this bed, you will miss out on lots of smiles and laughter and pretend play. And when you come try to join in, they will start giggling and say, Mom! Leave us alone, we're playing horses! Or store or house or pretending the stair platform is a stage.

The only reason I built this bed was because the room is so tiny (8x8 with small closet) it was very difficult for the kids to play, and then put their things away in a space the size of a short hallway. We'd done a loft bed years ago, but the loft bed was only accessible by children, and there was no where for guests to sleep in our house.

So we needed a loft bed WITH STAIRS that is sturdy and easy to access in a TINY room. With the window right there, I just didn't know how to make it work. And then one day, I realized that the stairs do NOT need to go all the way up to the bed. They only need to go up about 18" to 24" (normal height of kids mattress above floor) below the mattress.

The window was previously the obstacle in the way of building stairs. Now it's entertainment for the kids as they watch the chickens run around the back yard.

Under the bed, no storage is lost. I've been debating adding some custom sized rolling toy bins but the giant canvas bag is doing fine holding pillows, blankets and stuffed animals.

It is no exaggeration to say they play in their ALL DAY. I'm considering making a felt curtain for the front too ...

The best part about this bed is how easy and inexpensive it is to make. That's all 2x4s and 2x6s bringing the total cost of lumber up to about $50!!!
I am so excited about building this for Matt. I think i will do it this weekend so he will have a surprise when he comes back from Ohio with mamaw and papaw.

Materials and Tools
Shopping List:
14 – 2x4 @ 8 feet long
4 – 2x6 @ 8 feet long
2 – 2x2 @ 8 feet long
1 – 1x2 @ 8 feet long
2 ½” PH screws
4 – 2x6 @ 8 feet long
2 – 2x2 @ 8 feet long
1 – 1x2 @ 8 feet long
2 ½” PH screws
Tools:
measuring tape
square
pencil
safety glasses
hearing protection
drill
circular saw
sander
countersink drill bit
Cut List
Cut List:
4 – 2x4 @ 65 ½”
2 – 2x6 @ 37 ½”
4 – 2x4 @ 37 ½”
4 – 2x4 @ 75”
2 – 2x6 @ 75”
2 – 2x2 @ 75”
2 – 2x4 @ 30 ½”
2 – 2x4 @ 37 ½”
1 – 2x4 @ 41 ½”
2 – 2x4 @ 20 ½”
12 – 2x4 @ 22”
2 – 2x6 @ 43” (both ends cut 45 degrees off square, ends NOT parallel) – to be trimmed down in later steps
6 – 1x2 @ 7 ¾” (both ends cut at 45 degrees off square
6 – 2x4 @ 20 ½”
General Instructions
Please read through the entire plan and all
comments before beginning this project. It is also advisable to review
the Getting Started Section. Take all necessary precautions to build
safely and smartly. Work on a clean level surface, free of
imperfections or debris. Always use straight boards. Check for square
after each step. Always predrill holes before attaching with screws.
Use glue with finish nails for a stronger hold. Wipe excess glue off
bare wood for stained projects, as dried glue will not take stain. Be
safe, have fun, and ask for help if you need it. Good luck!
Step 1
Step 3
Now here's where we skip the glue. To make this
loft bed easy to disassemble, I did not use glue here. The inside width
for the mattress area should be 39", insetting the side rails 1 1/4"
from outsides. I did this so your PH screws have lots of board to grab
into.
This bed has NOT been weight tested or guaranteed. If you feel you need extra support - add metal brackets under the 2x6s.
An alternative method is to attach metal bed brackets directly to the ends if you have those.
Notice the cleat is added in this step to. I used 2 1/2" screws and glue to attach, screws every 6-8" all the way down.
This bed is designed to work with a bunkie board, but we just used 2x6s cut to length as the bed slats.
Step 5
Step 7
Step 8
Step 9
Finishing Instructions
Preparation Instructions:
Fill all holes with wood filler and let dry. Apply
additional coats of wood filler as needed. When wood filler is
completely dry, sand the project in the direction of the wood grain with
120 grit sandpaper. Vacuum sanded project to remove sanding residue.
Remove all sanding residue on work surfaces as well. Wipe project clean
with damp cloth.
It is always recommended to apply a test coat on a hidden area or scrap
piece to ensure color evenness and adhesion. Use primer or wood
conditioner as needed.
Tuesday, July 24, 2012
All Around the World Workout
Ok, so i was being lazy and surfing the web(i tend to do this too much) but I was trying to be good. I was looking through workouts and exercise routines and I came across this video. I liked the title so I clicked to watch and wow! I am in love. Reason number one: Fraking love her accent. Reason number two: these are simple workouts that can be spaced out through the day. Reason number three: The end of the clip is really moving! What an inspiration! I think I am going to do it right now. Although I am going to be careful of my ankle. I figured I would pass along the video. Enjoy. Comment to let me know how yall did.
Click here All around the World
Click here All around the World
Update
So ankle is not well. I have to make a doctors appt soon. I am thinking its stress fractures, but i am not a doctor. i need my doctor (doctor who)... lol. sry, i love me some dr who!
Saturday, July 21, 2012
Swinging the bat
Hey all. So today was pretty fun. I hopped in a softball tourney and played three games in a row this morning. It was not to hot, which was great! It was a coed team and we did alright. We lost but it was still fun. I enjoyed it greatly. Only bad thing though was that i did not do the best i can do. I missed balls in the outfield. But i sorta have a reason. I could not move that well. Past couple of months my ankle has been getting worse and worse. I already have issues with that foot and the doctors told me when i was younger that y foot would cause me issues when i got older. Well i think older is here. My ankle is just KILLING me. I am going to have to go to the doctor. But i dont know of any good ones around here. Anyone have any suggestions? I am chillen out and icing it today. Hopefully the swelling goes down some.
Thursday, July 19, 2012
Tuesday, July 17, 2012
Balsalmic Honey Pork Sliders
Trying out a new recipe today. It calls for coleslaw. It should be interesting, considering that I dont really like coleslaw. I am actually making it in the crock pot. Cooks for 9 hours! I hope its worth the trouble! Pics to come soon! Here's to hoping!
Friday, July 13, 2012
Lazy Girl Fitness
Well, Ladies ... and gentlemen. We all tend to be a little lazy from time to time, don't you agree? I don't know about all the rest of you but after getting up at 4am, going through a stressful work day just to come home and do all the housework, make dinner, pretend to spend a semblance of time with my family, and anything else that is required, I am wiped! Who has time for exercise? Well, I found a solution that may help you feel better about exercising and make you think about how many ways we use our bodies each day and how we can make them better! So for your enjoyment..... and a better bod. click here! Oh and don't forget to HAVE FUN. Life is to short to not appreciate the smaller things
Lazy girl Fitness!!! We all tend to be lazy! Check these out!
Lazy girl Fitness!!! We all tend to be lazy! Check these out!
Thursday, July 12, 2012
Attempting to Blog More
I go through these stages.... I will blog pretty often for a while then I will stop for a while. I am kind of tired of this cycle. So I have decided that I am going to try to be better about posting more . Lots of events are things are coming up in my life soon and I will need this a vent/opinion board. Speaking of boards.. I AM ADDICTED to Pinterest. I am seriously addicted. Its bad. I could scroll all day long. Of course I cant, cuz there is work....and food....... and ummmmm.... oh ya,.... life. Lol. Follow me on there. Click the button near the end of the sidebar. I hope all you readers out there enjoy the insight to my life as a mom, wife and many, many, other titles. Until I post again. Farewell and goodnight.
Subscribe to:
Comments (Atom)
